プロトコール(マウス)
Methods-Knockout Mouse
1. Construction of Targeting Vector
(1) long PCR Method
Murata T, Furushima K, Hirano M, Kiyonari H, Nakamura M, Suda S, Aizawa S. (2004)
ang is a novel gene expressed in early neuroectoderm, but its null mutant exhibits no obvious phenotype.
Gene Expr Patterns. 2004 dec;5(2):171-8
(2) BAC Recombination Method
2. Establishment of ES cells
(1)TT2 ES Cells from an F1 embryo between C57BL/6 and CBA
Yagi T, Tokunaga T, Furuta Y, Nada S, Yoshida M, Tsukada T, Saga Y, Takeda N, Ikawa Y, Aizawa S. (1993)
A novel ES cell line, TT2, with high germline-differentiating potency.
Anal Biochem. 1993 Oct;214(1):70-6
(2) HK3i ES cells from C57BL/6N embryos
Kiyonari H, Kaneko M, Abe S and Aizawa S. (2010)
Three Inhibitors of FGF Receptor, ERK and GSK3 Establishes Germline-Competent Embryonic Stem Cells of C57BL/6N Mouse Strain with High Efficiency and Stability.
Genesis 2010 May;48(5):317-27.
3. Screening of Homologous Recombinant ES cells
The ES cells are cultured on feeder cells,prepared with primary embryonic fibroblasts in either DMEM supplemented with 20% FBS and LIF (TT2 cells) or 3i medium with LIF (HK3i cells). The linealized targeting vector is electroporated into ES cells, and the cells are selected against G418. About one hundred G418 resistant colonies are isolated and trypsinized; one half of the cells in each colony is passaged into each well of 24 well plates with the feeder cells and the other half is subjected to the PCR analysis for homologous recombinant. For the PCR analysis, the cells are washed with PBS buffer, treated with protease K at 55 ℃ for 30 min, heat- treated at 95℃ for 10 min and used as templates. PCR positive colonies are passaged successively into φ22 mm, φ 35 mm, 25 cm2 and 2x25 cm2 feeders every 2-3 days and frozen at 5x10⁶ cells per tube; the homologous recombination is confirmed by Southern blot analysis.
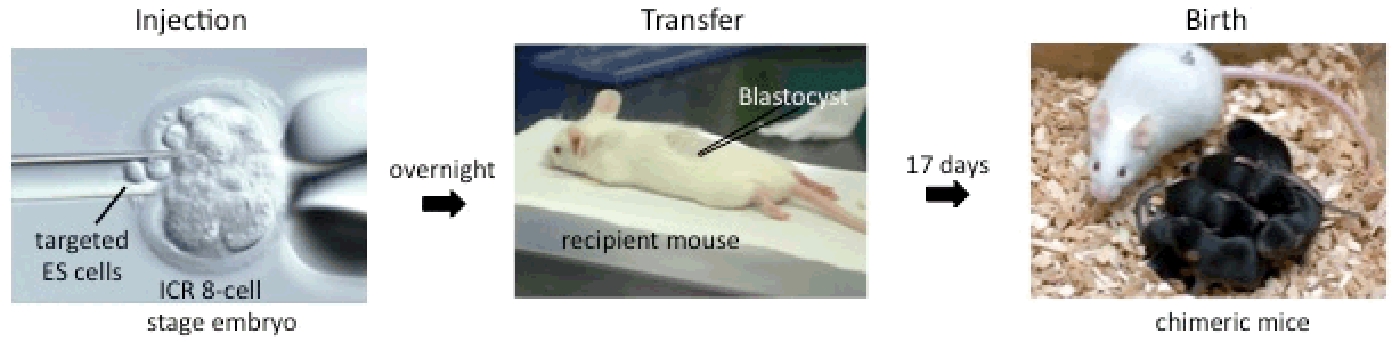
4. Production of Chimera Mice
Targeted ES cells are injected into ICR 8-cell stage embryos to generate chimeric mice. Usually most of the mice are 100 % ES-derived and mated with C57BL/6 to generate F1 heterozygotes.
Methods-Transgenic Mouse
注入用DNA溶液調製の手引き
standard-sized DNA(〜10kb程度)の場合
DNAの形状
線状DNAとし、ベクター配列部分を除いて下さい。
精製
一般にTg作製に用いられる方法で精製して下さい。市販の精製キット(QIAGEN QiaQuickやQiaEX II kitsなど)の使用も可能です。
DNA濃度
50ng/μl inTEに調整して下さい。当方で使用時に1〜5ng/μlになるようにPBS(-)(pH7.4)で希釈して使用します。
DNA量
30〜50μl。可能であればロットの異なるものを2本用意して下さい。
BAC DNAの場合
- DNAの形状は環状でも線状でも構いません。
- 精製法やModificationに関しては下記の参考文献2〜4をご参照下さい。
※ご不明な点はメール(mutant.bdr@riken.jp)またはCDB Web掲示板でお問い合わせ下さい。
送付方法
チューブにDNA名(=申込書に記載したTransgene Name)と濃度、調製日を明記の上、濃度調整後の電気泳動写真を添付し、冷蔵にて下記に送付して下さい。
理化学研究所 生命機能科学研究センター
生体モデル開発チーム トランスジェニックマウス担当者宛
文献/参考書
-
Factors affecting the efficiency of introducing foreign DNA into mice by microinjecting eggs.Brinster RL, Chen HY, Trumbauer ME, Yagle MK, Palmiter RD.
Proc. Nail. Acad. Sci. USA 82 4438-4442, July (1985) -
Homologous recombination based modification in Esherichia coli and germline transmission in transgenic mice of a bacterial artificial chromsomeYang XW, Model P, Heintz N.
Nature biotechnology.15 859-865 (1997) -
A gene expression atlas of the central nervous system based on bacterial artificial chromosomesGong S, Zheng C, Doughty ML, Losos K, Didkovsky N, Schambra UB, Nowak NJ, Joyner A, Leblanc G, Hatten ME, Heintz N.
Nature.425 917-925. (2003) -
Highly Efficient Modification of Bacterial Artificial Chromosomes (BACs) Using Novel Shuttle Vectors Containing the R6Kγ Origin of ReplicationGong S, Yang XW, Li C, Heintz N.
Genome Research.12 1992-1998 (2002) -
発生工学実験マニュアル トランスジェニックマウスの作り方勝木元也/編 講談社サイエンティフィク
-
Manipulating the Mouse Embryo.A Laboratory Manual. 3rd Edition.Nagy A, Gertsenstein M, Vintersten K and Behringer R.
Cold Spring Harbor Laboratory Press (2003)
Thawing pre-implantation embryos
(frozen by vitrification)
Prepare:
0.25M Sucrose (thawing medium - aliquoted for single use) – pre-warmed @ 37oC
Embryo culture medium* (e.g., KSOM, WM) - pre-equilibrated in CO2 incubator Petri dishes
- Remove the cryo tube from liquid nitrogen (LiqN2) (Figure 1).
- Remove the screw cap, immediately discard any remaining Liq N2 by inverting the cryo tube.
- Let the tube stand at ambient temperature for 60 – 90 seconds (Figure 2)*.
- Take 900 μl of pre-warmed thawing medium. At the end of the pre-warming period (see above - formation of a frosty ring on the freezing medium), tilt the tube (Figure 4).
- Quickly but gently add the pre-warmed thawing medium (Figure 4). Mix by gentle pipetting several times to thaw embryos while avoiding re-freezing#.
- Transfer the thawing medium with embryos to a petri dish (Figure 5).
- Collect embryos in the first drop of pre-equilibrated culture medium, and then rinse them through several drops of culture medium.
- Confirm condition of embryos. Typically, 80% or more embryos should look normal.
- Embryos are ready for oviduct transfer or in vitro culture.


Left:type-I Right:type-II


Simple vitrification of pre-implantation embryos
Prepare:
1M DMSO (in PB1) – pre-equilibrated in CO2 incubator
Dap213 (cryoprotective solution)- pre-chilled @ 0 oC
Ice water or cooling block (keep 0 oC)
cryotube (Cat. No. #MS-4501W: Sumitomo Bakelite Co., Ltd.)
Petri dishes
Liquid nitrogen (LN2)
- Put 2 drops of pre-equilibrated 1M DMSO (50 ul / drop) into a petri dish.
- Transfer the embryos from culture medium to a drop at room temperature.
- Transfer the embryos to the another drops to rinse (Fig.1).
- Transfer the embryos with 5 ul of 1M DMSO to a 1.0 mL cryotube (Fig.2).
- Transfer the cryotube to cooling block (or ice water) at 0oC for over 5 min.
- Gently add 95 ul of pre-chilled DAP123 (Fig.3)*.
- Let the tube stand at 0oC on cooling block (or ice water) for 5 min.
- Quickly dip the bottom of the tube in LN2 for a few seconds and release.
- Transfer the tube to freezing box (or cane) for LN2.
will be difficult to remove the screw cap at thawing.


Referece:
Nakao K et al. (1997)
Simple and efficient vitrification procedure for cryopreservation of mouse embryos.
Exp. Anim. 46(3): 231-234.